How to Create & Run an AWS Glue ETL Job — Complete Hands-On Guide
This guide walks you through the entire process of creating an AWS Glue ETL Job — from setting up prerequisites, configuring job properties, writing the ETL script, to running and monitoring the job.
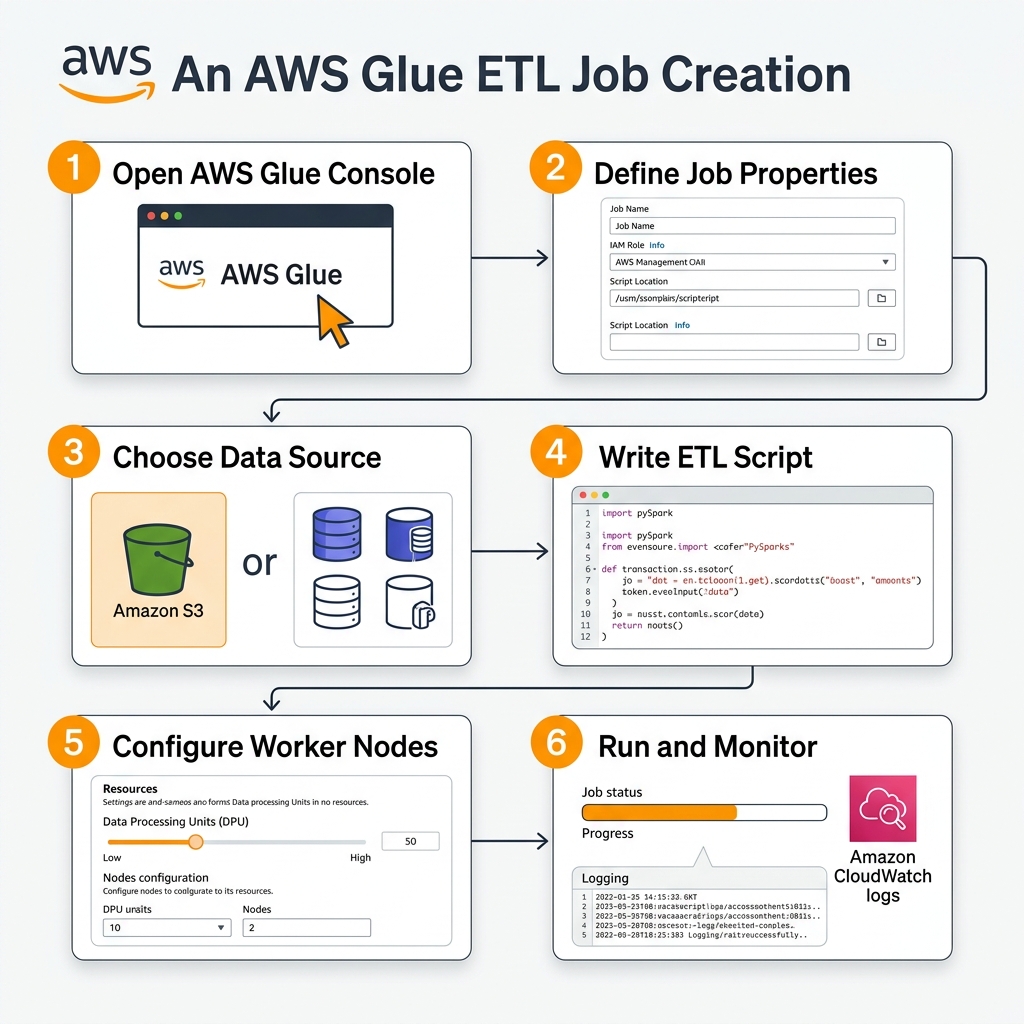
Prerequisites
Before creating your first Glue job, ensure these are in place:
1. IAM Role for AWS Glue
Create an IAM Role that Glue can assume. It must have:
Trusted Entity: glue.amazonaws.com

Required Managed Policies:
├── AWSGlueServiceRole           (Core Glue permissions)
├── AmazonS3FullAccess           (Read/Write to your S3 buckets — scope down in production!)
└── CloudWatchLogsFullAccess     (For job logging)
Creating the role via AWS CLI:
# Create the IAM role with Glue as the trusted entity
aws iam create-role \
    --role-name AWSGlueETLRole \
    --assume-role-policy-document '{
        "Version": "2012-10-17",
        "Statement": [{
            "Effect": "Allow",
            "Principal": {"Service": "glue.amazonaws.com"},
            "Action": "sts:AssumeRole"
        }]
    }'

# Attach necessary policies
aws iam attach-role-policy \
    --role-name AWSGlueETLRole \
    --policy-arn arn:aws:iam::aws:policy/service-role/AWSGlueServiceRole

aws iam attach-role-policy \
    --role-name AWSGlueETLRole \
    --policy-arn arn:aws:iam::aws:policy/AmazonS3FullAccess
2. S3 Buckets
Set up your data and script storage:
s3://my-data-lake/
├── raw/                    ← Source data (input)
│   ├── clickstream/
│   │   ├── 2026-05-28.csv
│   │   ├── 2026-05-29.csv
│   │   └── 2026-05-30.csv
│   └── users/
│       └── users.csv
├── transformed/            ← Cleaned output (target)
│   └── daily_metrics/
├── scripts/                ← ETL scripts
│   └── my_etl_job.py
└── temp/                   ← Glue temporary directory
3. Data Catalog Tables
Run a Crawler first (or create tables manually) so Glue knows your source schema:
# Create and run a Crawler to register your source data
aws glue create-crawler \
    --name raw-clickstream-crawler \
    --role AWSGlueETLRole \
    --database-name raw_events_db \
    --targets '{"S3Targets": [{"Path": "s3://my-data-lake/raw/clickstream/"}]}'

aws glue start-crawler --name raw-clickstream-crawler
Step 1: Create the Glue Job via Console
Navigate to the AWS Glue Console → ETL Jobs → Create Job. You can choose to create a visual ETL job (e.g., using a blank canvas or a source/target template).
The AWS Glue Studio Visual Editor Interface
Below is the actual AWS Glue Studio interface that you will see when building a visual ETL job:
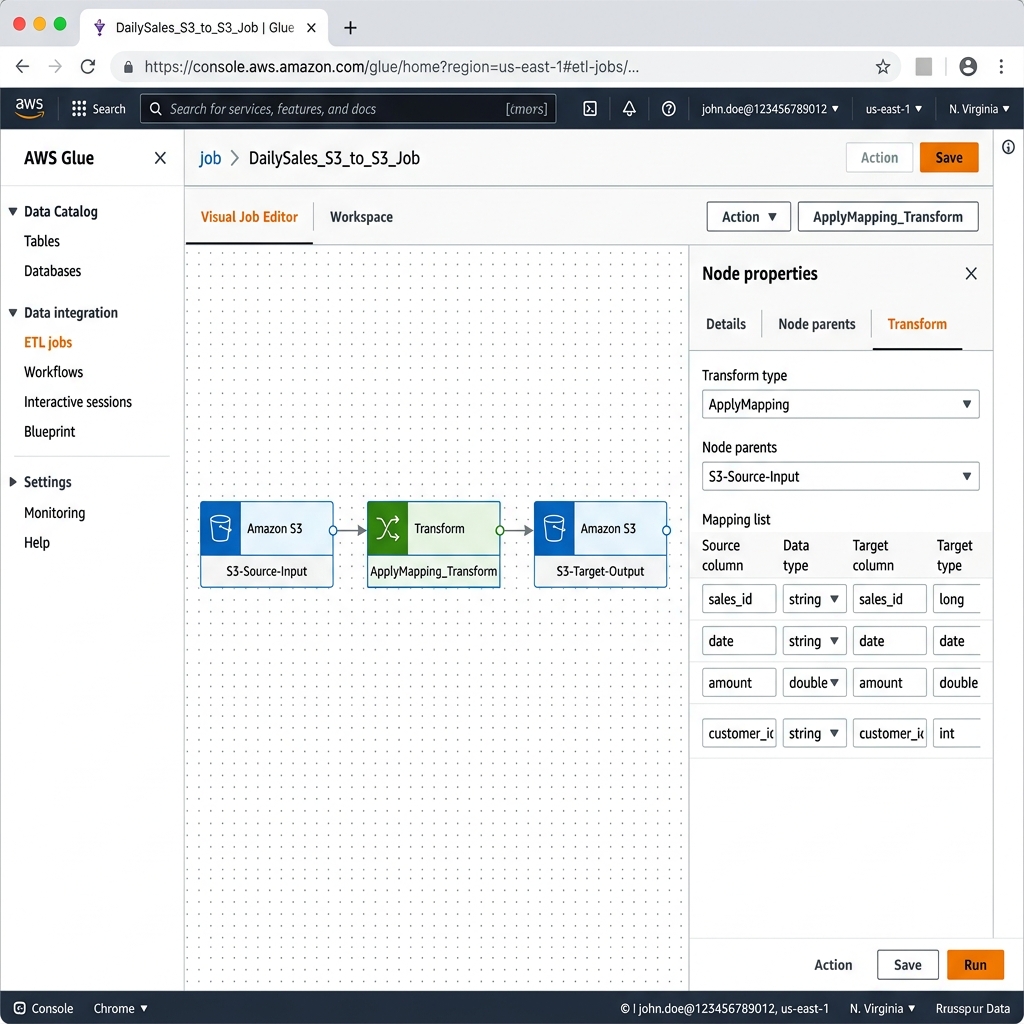
This browser-based graphical workspace is organized into the following key panels:
- Left Navigation Pane: Displays quick access links to the Data Catalog (Tables, Databases), Data Integration (ETL Jobs, Workflows, Interactive Sessions, Blueprints), and Settings (Monitoring, Help).
- Visual Canvas (Center): The drag-and-drop workspace where you design your ETL pipeline using a directed acyclic graph (DAG). The nodes represent different steps of the flow:
- Source Nodes (e.g.,
Amazon S3 / S3-Source-Input): Connects to your raw input data store. - Transform Nodes (e.g.,
Transform / ApplyMapping_Transform): Applies data manipulation logic. - Target Nodes (e.g.,
Amazon S3 / S3-Target-Output): Configures where the cleaned data will be saved. - Node Properties Panel (Right): Appears when any node in the canvas is clicked. It allows you to configure specific parameters. In the Transform tab for the
ApplyMappingnode, you can define: - Transform Type: Dropping, mapping, or renaming columns.
- Node Parents: Setting data flow dependency.
- Mapping List: Mapping the source columns and their data types directly to target columns and target data types (e.g., casting
sales_idfromstringtolong,amountfromdoubletodouble, etc.). - Action & Control Bar (Top Right): Quick access buttons to Action menus, Save, and Run the ETL job.
Job Properties Configuration
| Property | Value | Explanation |
|---|---|---|
| Job Name | daily_clickstream_etl |
A descriptive, unique name for your job. |
| IAM Role | AWSGlueETLRole |
The role you created in Prerequisites. |
| Type | Spark |
Use Spark for distributed processing. Use Python Shell for lightweight tasks. |
| Glue Version | Glue 4.0 (Spark 3.3, Python 3.10) |
Always use the latest for best performance. |
| Language | Python 3 |
PySpark script. |
| Script Location | s3://my-data-lake/scripts/my_etl_job.py |
Where your ETL script is stored. |
| Temporary Directory | s3://my-data-lake/temp/ |
Glue uses this for intermediate shuffle data. |
| Number of Workers | 5 |
Start small; use Auto Scaling in Glue 3.0+. |
| Worker Type | G.1X |
4 vCPUs, 16 GB RAM per worker. |
| Job Timeout | 60 minutes |
Maximum runtime before Glue kills the job. |
| Max Retries | 1 |
Number of automatic retries on failure. |
| Job Bookmark | Enable |
For incremental processing. |
Step 2: Create the Glue Job via AWS CLI
Alternatively, create the job programmatically:
aws glue create-job \
    --name daily_clickstream_etl \
    --role AWSGlueETLRole \
    --command '{
        "Name": "glueetl",
        "ScriptLocation": "s3://my-data-lake/scripts/my_etl_job.py",
        "PythonVersion": "3"
    }' \
    --default-arguments '{
        "--TempDir": "s3://my-data-lake/temp/",
        "--job-bookmark-option": "job-bookmark-enable",
        "--job-language": "python",
        "--enable-metrics": "true",
        "--enable-continuous-cloudwatch-log": "true"
    }' \
    --glue-version "4.0" \
    --number-of-workers 5 \
    --worker-type "G.1X" \
    --timeout 60 \
    --max-retries 1
Step 3: Write the ETL Script
This is the core of your Glue job — the PySpark script that defines your data transformation logic.
Template: Complete AWS Glue ETL Script
import sys
from awsglue.transforms import *
from awsglue.utils import getResolvedOptions
from pyspark.context import SparkContext
from awsglue.context import GlueContext
from awsglue.job import Job
from awsglue.dynamicframe import DynamicFrame
from pyspark.sql import functions as F

# ============================================================
# 1. INITIALIZATION — Set up GlueContext, SparkSession, and Job
# ============================================================
args = getResolvedOptions(sys.argv, ['JOB_NAME'])

sc = SparkContext()
glueContext = GlueContext(sc)
spark = glueContext.spark_session
job = Job(glueContext)
job.init(args['JOB_NAME'], args)

# ============================================================
# 2. EXTRACT — Read source data from the Glue Data Catalog
# ============================================================
# Option A: Read from Data Catalog (recommended)
clickstream_dyf = glueContext.create_dynamic_frame.from_catalog(
    database="raw_events_db",
    table_name="clickstream",
    transformation_ctx="clickstream_source"  # Required for Job Bookmarks!
)

# Option B: Read directly from S3 (without Data Catalog)
# clickstream dyf = glueContext.create dynamic frame.from options(
#     connection type="s3",
#     format="csv",
#     connection options={
#         "paths": ["s3://my-data-lake/raw/clickstream/"],
#         "recurse": True
#     },
#     format options={
#         "withHeader": True,
#         "separator": ","
#     }
# )

print(f"✅ Source record count: {clickstream_dyf.count()}")
clickstream_dyf.printSchema()

# ============================================================
# 3. TRANSFORM — Clean, filter, and enrich the data
# ============================================================

# Convert DynamicFrame to Spark DataFrame for richer transformations
df = clickstream_dyf.toDF()

# --- 3a. Data Cleaning ---
# Remove null user ids and duplicate events
df_cleaned = df \
    .filter(F.col("user_id").isNotNull()) \
    .dropDuplicates(["user_id", "event_type", "event_timestamp"])

# --- 3b. Data Type Casting ---
# Ensure correct data types
df_typed = df_cleaned \
    .withColumn("event_timestamp", F.to_timestamp("event_timestamp")) \
    .withColumn("amount", F.col("amount").cast("double"))

# --- 3c. Data Enrichment ---
# Add derived columns
df_enriched = df_typed \
    .withColumn("event_date", F.to_date("event_timestamp")) \
    .withColumn("event_hour", F.hour("event_timestamp")) \
    .withColumn("is_purchase", F.when(F.col("event_type") == "purchase", True).otherwise(False))

# --- 3d. Aggregation ---
# Daily user metrics
df_daily_metrics = df_enriched.groupBy("user_id", "event_date").agg(
    F.count("*").alias("total_events"),
    F.sum(F.when(F.col("is_purchase"), F.col("amount")).otherwise(0)).alias("total_revenue"),
    F.countDistinct("event_type").alias("unique_event_types"),
    F.min("event_timestamp").alias("first_event"),
    F.max("event_timestamp").alias("last_event")
)

print(f"✅ Transformed record count: {df_daily_metrics.count()}")

# ============================================================
# 4. LOAD — Write transformed data to target
# ============================================================

# Convert back to DynamicFrame for Glue-native write
output_dyf = DynamicFrame.fromDF(df_daily_metrics, glueContext, "output")

# Option A: Write to S3 as Parquet (partitioned by date)
glueContext.write_dynamic_frame.from_options(
    frame=output_dyf,
    connection_type="s3",
    format="glueparquet",
    connection_options={
        "path": "s3://my-data-lake/transformed/daily_metrics/",
        "partitionKeys": ["event_date"]
    },
    transformation_ctx="write_output"  # Required for Job Bookmarks!
)

# Option B: Write directly to a Data Catalog table
# glueContext.write dynamic frame.from catalog(
#     frame=output dyf,
#     database="analytics db",
#     table name="daily user metrics",
#     transformation ctx="write catalog output"
# )

# Option C: Write to Amazon Redshift
# glueContext.write dynamic frame.from jdbc conf(
#     frame=output dyf,
#     catalog connection="my-redshift-connection",
#     connection options={
#         "dbtable": "analytics.daily user metrics",
#         "database": "my redshift db"
#     },
#     redshift tmp dir="s3://my-data-lake/temp/redshift/"
# )

print("✅ Data successfully written to target!")

# ============================================================
# 5. COMMIT — Finalize the job and save the bookmark state
# ============================================================
job.commit()
print("✅ Job committed. Bookmark state saved.")
Step 4: Understanding the Script — Section by Section
Section 1: Initialization
args = getResolvedOptions(sys.argv, ['JOB_NAME'])
sc = SparkContext()
glueContext = GlueContext(sc)
spark = glueContext.spark_session
job = Job(glueContext)
job.init(args['JOB_NAME'], args)
| Line | Purpose |
|---|---|
getResolvedOptions |
Parses command-line arguments passed by Glue (job name, custom params). |
SparkContext() |
Creates the core Spark execution context. |
GlueContext(sc) |
Wraps SparkContext with Glue-specific methods (catalog read/write). |
spark_session |
The SparkSession for DataFrame/SQL operations. |
job.init() |
Initializes the Job object (required for Job Bookmarks to work). |
Section 2: Extract
clickstream_dyf = glueContext.create_dynamic_frame.from_catalog(
    database="raw_events_db",
    table_name="clickstream",
    transformation_ctx="clickstream_source"
)
Critical: The
transformation_ctxparameter is mandatory for Job Bookmarks. Without it, Glue cannot track which data has already been processed, and every run will reprocess everything!
Section 5: Commit
job.commit()
Critical: Always call
job.commit()at the end. This saves the Job Bookmark state. If your script exits without committing, the bookmark state is NOT updated, and the next run will reprocess the same data.
Step 5: Run the Glue Job
Via Console
- Go to AWS Glue Console → ETL Jobs → Select your job.
- Click Run Job.
- (Optional) Override parameters in the Run dialog.
Via AWS CLI
# Start the job run
aws glue start-job-run --job-name daily_clickstream_etl

# Start with custom arguments
aws glue start-job-run \
    --job-name daily_clickstream_etl \
    --arguments '{
        "--input_path": "s3://my-data-lake/raw/clickstream/2026-05-30/",
        "--output_path": "s3://my-data-lake/transformed/daily_metrics/"
    }'
Via Boto3 (Python SDK)
import boto3

glue_client = boto3.client('glue', region_name='us-east-1')

response = glue_client.start_job_run(
    JobName='daily_clickstream_etl',
    Arguments={
        '--input_path': 's3://my-data-lake/raw/clickstream/2026-05-30/',
        '--output_path': 's3://my-data-lake/transformed/daily_metrics/'
    }
)

job_run_id = response['JobRunId']
print(f"Job started with Run ID: {job_run_id}")
Step 6: Monitor the Job
Monitoring via Console
Navigate to AWS Glue Console → ETL Jobs → Click your job → Run Details tab.
You will see:
- Run Status:
STARTING→RUNNING→SUCCEEDED/FAILED - Execution Time: Total DPU-hours consumed
- Error Logs: Direct link to CloudWatch Logs
Monitoring via CLI
# Get the status of a specific job run
aws glue get-job-run \
    --job-name daily_clickstream_etl \
    --run-id jr_abc123xyz

# Get all recent runs
aws glue get-job-runs \
    --job-name daily_clickstream_etl \
    --max-results 5
CloudWatch Logs
Glue streams logs to two CloudWatch Log Groups:
| Log Group | Content |
|---|---|
/aws-glue/jobs/output |
Your script's print() statements and standard output. |
/aws-glue/jobs/error |
Error messages, stack traces, and Spark exceptions. |
Step 7: Schedule with Triggers
Create a Scheduled Trigger (Daily at 2 AM UTC)
aws glue create-trigger \
    --name daily_clickstream_trigger \
    --type SCHEDULED \
    --schedule "cron(0 2 * * ? *)" \
    --actions '[{
        "JobName": "daily_clickstream_etl",
        "Arguments": {
            "--job-bookmark-option": "job-bookmark-enable"
        }
    }]' \
    --start-on-creation
Create a Conditional Trigger (Run after Crawler)
aws glue create-trigger \
    --name after_crawler_trigger \
    --type CONDITIONAL \
    --predicate '{
        "Logical": "AND",
        "Conditions": [{
            "LogicalOperator": "EQUALS",
            "CrawlerName": "raw-clickstream-crawler",
            "CrawlState": "SUCCEEDED"
        }]
    }' \
    --actions '[{"JobName": "daily_clickstream_etl"}]' \
    --start-on-creation
Common Issues & Troubleshooting
| Issue | Cause | Solution |
|---|---|---|
Job fails with AccessDeniedException |
IAM Role lacks permissions to read/write S3 or Catalog. | Add required S3 and Glue policies to the IAM Role. |
| Job reprocesses all data every run | Missing transformation_ctx in read/write calls, or job.commit() not called. |
Add transformation_ctx to all from_catalog/from_options calls and ensure job.commit() runs. |
No such database error |
Data Catalog database doesn't exist. | Run the Crawler first, or create the database manually via aws glue create-database. |
| Slow job performance | Too few workers, data skew, or unoptimized file formats. | Increase workers, enable Auto Scaling, use Parquet/ORC instead of CSV, check partition distribution. |
| Out Of Memory (OOM) | Workers don't have enough RAM for the data volume. | Upgrade to G.2X or G.4X worker type, or increase worker count. |
| Script not found | Script S3 path is incorrect or inaccessible. | Verify the S3 path and that the IAM Role can read from that bucket. |
Best Practices Checklist
- ✅ Always use
transformation_ctxin read/write methods for reliable Job Bookmarks. - ✅ Always call
job.commit()at the end of your script. - ✅ Use Parquet/ORC as output formats for columnar performance gains.
- ✅ Partition output data by date/region keys for efficient downstream queries.
- ✅ Enable Auto Scaling (Glue 3.0+) to optimize costs.
- ✅ Enable continuous CloudWatch logging for real-time debugging.
- ✅ Set job timeouts to prevent runaway jobs from incurring unexpected costs.
- ✅ Use Glue 4.0 for latest Spark features and performance improvements.
- ✅ Scope IAM permissions — avoid
S3FullAccessin production; restrict to specific buckets. - ✅ Test locally using the AWS Glue Docker image before deploying to AWS.
Summary
| Step | Action | Tool |
|---|---|---|
| 1 | Set up IAM Role & S3 buckets | AWS Console / CLI |
| 2 | Run Crawler to discover source schema | Glue Console / CLI |
| 3 | Create Glue Job with properties | Console / CLI / Boto3 |
| 4 | Write PySpark ETL script | Code Editor / Glue Studio |
| 5 | Run the job | Console / CLI / Boto3 |
| 6 | Monitor execution & logs | Console / CloudWatch |
| 7 | Schedule with Triggers | Console / CLI |
You are now equipped to build production-grade AWS Glue ETL pipelines from scratch!